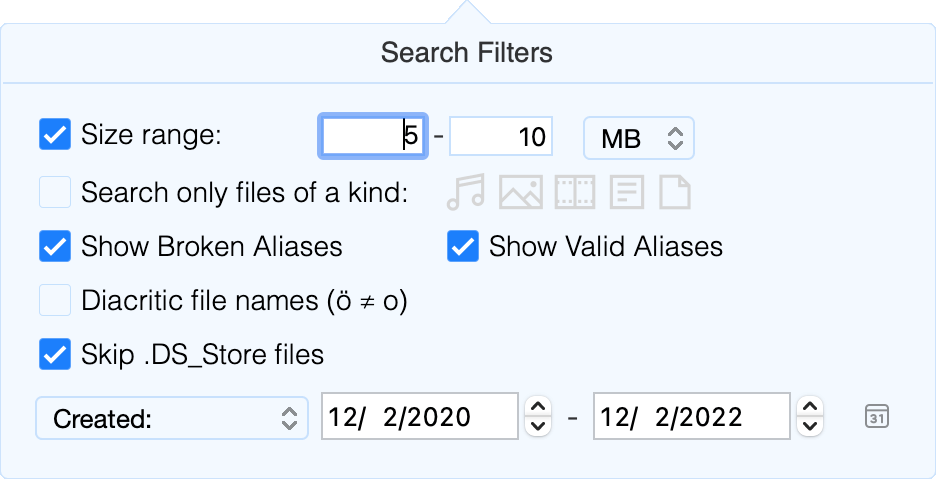
DirEqual icon

Scherlokk User Manual

EnglishFrenchGermanItalianPortugueseRussianSpanish
Introduction
Scherlokk allows you to search local and remotely mounted disks. It first uses Spotlight to quickly display preliminary search results, then applies its own engine to thoroughly locate any files that might be missed. Because Scherlokk physically scans every file in the searched folders, no file can be overlooked.

The search criteria in Scherlokk are easy to customize. You can restrict your search to specific locations or file types, including music, pictures, movies, documents, or binary files.
Description

Scherlokk’s main window is divided into five sections:


  • Toolbar contains the main controls.
  • File description area enter the file name or content to search for.
  • Search results table displays results along with a path selector.
  • Path controller shows the path of the selected item.
  • Inspector – provides a quick preview and details of the selected item.


Scherlokk requires Full Disk Access permission to search all folders on your computer.
[Learn more here]
Search Options
You can narrow search results by specifying file size, date, and type. Only files that meet these criteria will be included in the results.


Search Filters:
Search in Subfolders
– enables searching within all subfolders of the selected folder.
Search in Packages – includes package folders such as applications, frameworks, Xcode projects, and more in the search.
Search Invisible/Hidden Items – includes hidden files in the search. By default, hidden and system files are invisible in Finder and are not indexed by Spotlight.

File size between
– allows you to specify a file size range. The size can be entered in B, kB, MB, or GB.
File kind – choose any combination of file types or select all files.
Diacritic – enabling this option in the popup will distinguish national characters (e.g., ó, ä, ú, á).

Displayed Items:
Folders – enable this option to find folders. If you are searching for files, keep this option off to shorten the list of search results.

Text Search Options:
Ignore Case – searches without distinguishing between uppercase and lowercase letters.
Whole Words – searches for the text string only when it appears as a standalone word, not as part of another word.

Date – allows you to find files created or modified within a specified date range. Click the calendar icon on the right to open the date dialog. You can set the range using the start and end calendars or by specifying the number of days relative to today.

Add or Exclude Folders – allows you to specify which folders should be included or excluded from the search. You can create lists of multiple search folders and excluded folders to expand or narrow the search locations.
Select a Folder to Search – click the Open button to choose a folder from the dialog, or simply drag and drop any folder into the location area.

Search Inside Files – enter the content you want to search for within files. To search for multiple terms, enter each term on a separate line. Use the combobox on the right to choose whether Scherlokk should find files containing all terms or any of the terms. Use the Enter key to separate search terms.
Table Header – allows you to sort the search results by any column. In addition, headers are highlighted in blue to indicate active search criteria. For example, if you set a date range, the Date column header will appear in blue. Similarly, if you search for a specific part of a file name, the Name column header will be highlighted in blue.


Search Results Table – when you search for content inside a file, the results table shows the first occurrence along with a short context. The found term is highlighted in blue.

You can select one or multiple files and perform actions from the contextual menu (accessed via right-click or Ctrl+click). The commands in the context menu correspond to the toolbar buttons and the main File menu.

To open a file in the internal hex editor, choose Edit in Hex Editor from the context menu or hold the Alt key and double-click the file.

Press Enter or click the selected item again to rename it:

Full Disk Access
How to Grant Full Disk Access to Scherlokk on macOS

Some macOS features, such as searching for files in system folders or external drives, require apps like Scherlokk to have Full Disk Access. Follow these steps to grant Scherlokk the necessary permissions:


Step 1: Open System Settings
1. Click the Apple menu () in the top-left corner of your screen.
2. Select System Settings (on macOS Ventura and later) or System Preferences (on macOS Monterey and earlier).


Step 2: Navigate to Privacy & Security
1. In System Settings, scroll down the sidebar and click Privacy & Security.
2. For older macOS versions, click Security & Privacy and then navigate to the Privacy tab.


Step 3: Locate Full Disk Access
1. Scroll through the list of options on the right-hand side until you find Full Disk Access.
2. Click on it to see the list of apps currently requesting or granted access.


Step 4: Add Scherlokk to the List
1. If Scherlokk is not already listed:
• Click the plus (+) button or Add Application.
• A file browser window will appear. Navigate to the location of Scherlokk (usually in the Applications folder).
• Select Scherlokk and click Open.
2. If Scherlokk is already listed but unchecked, simply enable it by toggling the switch or checking the box next to it.


Step 5: Authenticate Changes
1. You’ll need to unlock the settings to make changes:
• Click the lock icon in the bottom-left corner of the window.
• Enter your Mac Administrator password or authenticate using Touch ID (if available).
2. Once authenticated, confirm that Scherlokk is added and enabled.


Step 6: Restart Scherlokk
1. Close and restart the Scherlokk app to ensure the new permissions take effect.
2. After relaunching, Scherlokk will now have access to perform its tasks effectively.


Troubleshooting Tips
• If Scherlokk isn’t working as expected after granting Full Disk Access, double-check the permissions in the Privacy & Security settings.
• If you’re still encountering issues, restart your Mac.


System Settings window:
Following these steps will grant Scherlokk the necessary permissions to access all relevant files on your Mac, ensuring efficient searching and full functionality.

Extending a license for all users on a computer
By default, the license is valid only for the user who enters the license key. However, it can be extended to all users on the computer, including new users.

To extend the license for all users, open the About dialog and click on a registered user name. A detailed description is available
here.
Questions, Feedback and Contact
Should you have any questions, please go to our support page.